Wednesday, December 31, 2014

New Year, New Beginnings

Wishing you a new year full of growth, 
creativity and adventure!

2015 promises big changes and 
exciting new experiences for me, 
and for my business.

As wheels are set in motion 
over the next few weeks
things will be pretty busy around here - 
I will fill you in on the progress 
as I have time to post.

I can say one thing right now, 
2015 is gonna be GREAT!
I hope you'll join me for the ride.

Have a safe and happy New Year
 ~ and ~
if you have goals or dreams for the coming year, 
I'd love to hear about them in the Comments.


Wednesday, December 24, 2014

Dreaming of a White Christmas

 Today is Christmas Eve, and like many of you,
I'm busily preparing for Santa's Big Day!
I have to admit that I'm a little sad our snow is melting. Fast.

Snow or no snow,
I wanted to share with you 
the gift I just finished making 
my 3 year old niece, Breezy. 
Because she loves a picnic, I made her felt play food 
to enjoy any time of year.

I've thought about making these templates available
for your use as a free PDF in the sidebar.
If you'd like that, leave me a comment and 
I'll gladly make that happen. Thanks!

 Sugar cookies and Christmas cookies all set for the hearth tonight. 
Here's a hearty breakfast: a short stack of pancakes with a pat of butter, a couple of fried eggs (one not shown) and some crispy bacon. 

I really got in to making these for Breezy, 
and I hope they give her hours of imaginative play!


Enjoy: Winter Wonder by The Florin Street Band

Wishing you the happiest of holidays,
and a New Year full adventures for us all!
See you in 2015!


Wednesday, December 3, 2014

The Stuff of Dreams


Hibernating...Dreaming...Making.
Magic is in the air as change embraces the studio,
and the studio embraces change. 

Piles of treasures are heaped throughout,
sparkling and iridescent, or soft like a whisper.
Hand dyed, hand stitched. 
Stories of enchantment lie within.
These are the tools of my trade. 
In the coming year, exciting offerings will be made. 
New work and new workshops -  
I think you're really going to like them!

In the mean time, you can bet
there will be holiday cookies and eggnog,
twinkling lights, Christmas music and movies, 
and best of all, 
special moments with my family and friends. 

Here's to a very happy season of gift making and gift giving!
What's your favorite holiday tradition? 
I'd love to hear!

Wednesday, November 19, 2014

(More) Ladies Are Here!

 Get out the potato salad...it's time for a picnic!
  Inspired by the irresistible Ladies Who Lunch wall quilt, 
my little niece's favorite "blanket",
 I designed this spunky table runner and placemat set
appropriately titled (More) Ladies Who Lunch
With basic sewing, quilting and embroidery skills 
you can transform your scraps into sweet, playful Ladybugs
who are ready for a picnic any day of the year. 

Complete instructions include plenty of helpful photos, 
 tips, techniques and the Ladybug template. 
The table runner and set of four placemats can be 
finished in one or two weekends. 
Make one project or both, and let the indoor picnic begin!

 Find all of my sewing patterns for sale on Craftsy
by clicking here: Tierney's Craftsy Pattern Store

It's the perfect time of year to knit up hats, mittens and 
scarves for those in need in our communities!

For any one in the Cortland area interested in keeping 
young and old toasty warm this winter,
 please check out 
Keep Cortland Warm on Facebook 
for drop off locations and knitting inspiration.
I use "Kim's Hats" pattern from PurlBee, 
but any pattern you use will be greatly appreciated. 

I'd love to hear what your favorite hat pattern is -
leave me a comment, and Happy knitting!

Friday, October 31, 2014

Halloween Flash Sale!

Today through Sunday, November 2nd, 2014
all bags in my Etsy shop are 10% off!

Use Coupon Code: GOBLINS14
This limited time discount is for ready-made bags only, 
not PDF sewing patterns.


Give your knitting a new home this season, or
keep your hand sewing projects safe and neat!
Run around town with a unique bag that reflects 
your sweet and lovely personality!

Enjoy details like generous pockets,
easy to use button closures and overall durability.

You deserve a TREAT this Halloween!

Wednesday, October 22, 2014

In Triplicate

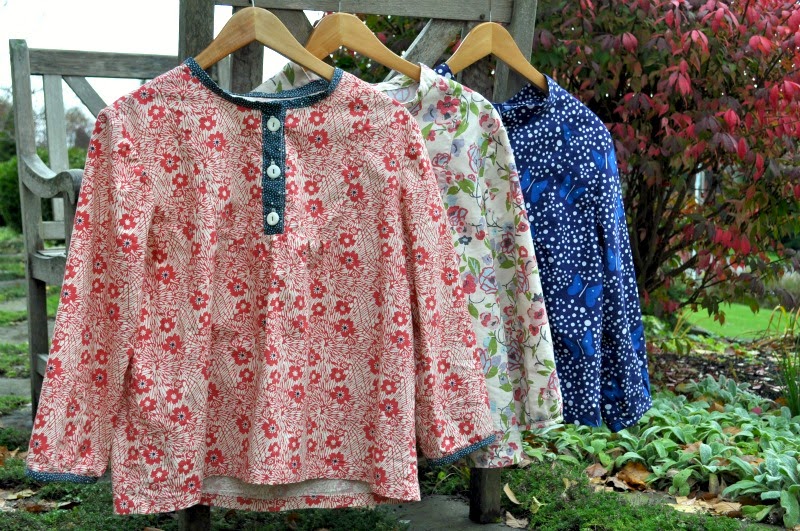
 At long last, I've had some time to sew the
Wiksten Tova top, and not just once but three times,
and each a little differently.
Can I start by saying how much I love this pattern?
 The instructions are clear and offer plenty of helpful 
photos, especially for details like this smart sleeve band.
 For this top, I made the neck band exactly the same way
as the sleeve band. I prefer this look because 
it doesn't overwhelm my frame.
 By the time I sewed this one, I felt pretty confident 
with my personal adjustments to the pattern; for example,
I altered the shoulders and sleeves for my petite size,  
 reduced the size of the bib and added buttons to the placket. 
I decided to gather the pleats at the center, too.
These sweet antler buttons are from my friend,
Christine Johnson!
From cutting to finishing, each top took about one work day.
Wearing any of these tops makes me feel comfortable 
and happy. I'll set my sights on solids next, perhaps linen.
With so many examples of the Wiksten Tova top online, 
inspiration will be easy to come by!

Have you sewn this top?
I'd love to hear what you think about the pattern
and your results!


Wednesday, October 8, 2014

What's Up, Buttercup?


Such a sunny October greeting!
 Last week, I announced my newest project, 
building a doll house and exploring the world of miniatures.

Above is a photo of the kit I purchased online at 
As a beginner, I looked for a house that seemed like 
it would keep my interest, but hopefully not be more 
than I could handle. I also kept an eye on price 
because I didn't want to sink a lot of money into 
such unknown territory. 

The Buttercup was the winner! 
I purchased individual roof shingles separately, 
while the rest of the components are included in the kit.
 After reading and rereading the instructions and 
helpful tips packet, I dove in
Above, the first batch of pieces: sanded, filled and primed.

One helpful tip is to lay painted components over spaghetti
so they won't stick to the paper as they dry. Brilliant.
 Working steadily along during evening hours
the same components now have two coats of 
satin latex paint. Lowe's sells small, affordable pots of paint 
in a limited, but very nice range of colors, 
and I was able to find three for my little Buttercup.  

In a future post I'll show the wood floor (sold separately)
that is now sanded, polyurethaned and adhered to the first floor.
I should mention that I can already see how this project is 
going to go, what with wallpaper, flooring, lighting,
furniture, accessories and people yet to acquire,
this is neither an overnight project 
nor an inexpensive one, but wow, is it fun!

So far, I'm finding all of this to be manageable 
because I can stop and move on to other things
at any time. 

I will continue to show Buttercup updates right here. 
Send me any questions - I'm happy to share.
I've been working on this long overdue Project Linus quilt. 
Shown here is the untrimmed quilt top. 
I had a few diamonds left from a 
previous Diamonds quilt for Project Linus  
and was itching to put them to use.
This new one should be perfect for a girl in grade school.
I'll finish it in the next week or two, and then 
(thank you all for your votes!), both of which will also be 
donated to Project Linus.

Do you have a favorite quilt pattern 
that you reach for again and again?
I'd love to hear!

Wednesday, October 1, 2014

Things That Go Bump In the Night

 Today, October 1st, I'm finally setting up my work station to
delve into the world of miniatures. 
My interest has been growing for a few years, and finally
I gave in and admitted to myself that I'd really like  
to try building miniature houses.
Why I take so long to have some fun, I'll never know, 
but ever since I gave in, the flood gates have opened 
and ideas are rushing in. 

In the spirit of Halloween, 
I'm sharing a few inspiring miniature haunted houses 
from my Pinterest Board, Dwellings.
 To dip my toe in the pond, I ordered two modest kits 
that I'll show in a future post.
So far, I've read the instructions and the helpful tips packet 
more than a few times. Oh, I've also stared at the numerous
pieces and parts thinking, "How am I going to keep these straight?"
Imagining an upside down house or some other awkward 
and really wrong final result, I just keep reminding myself to 
follow the instructions and all will be well.
 So, all that's left is to set up the work table 
and begin learning by doing. And today is that day!
 Aren't all of these haunted houses great?!
Just to be clear, I didn't build 
any of these in today's post. You can find them all on my 
Pinterest board with links back to the makers.


October is a fun month, between the fall foliage, 
rapidly changing weather, pumpkins in the field 
and little ghosts, ballerinas and firefighters going door to door...
it's the perfect time to start sanding, painting and creating 
small haunted, and not so haunted, houses.
 I will post updates on my miniature endeavors.
If you have tips and tricks to share, 
please leave me a comment. I'm wide open to guidance.
In the meantime, since it is October,
I'd love to hear what your little trick-or-treaters 
are planning to dress up as!


Wednesday, September 24, 2014

Felting, a Gathering and a Tutorial

 Hooray for another gathering at Cheri Sheridan's studio,
Once In A Blue Moon Art Barn!
Our focus was mostly wet felting, 
but a little needle felting snuck in to the mix, too.
I had the pleasure of sharing with Cheri, Carol and Erika 
the basic steps for creating a jellyroll of fibers 
to be wet felted and then cut 
into discs or other configurations. 

 Below, I'm sharing a tutorial so you can join in the fun, too! 

Back to the Art Barn:
Above, you can see Cheri's layers of fibers getting a
cheery dose of brightly dyed curly locks. 
Curly locks work really well with this technique because 
they only condense more during felting, exposing bright  
spots of color once the roll is sliced into (see pics below). 
Carol Boyer builds her jellyroll layers.
Visit her blog - it's full of inspiration, creativity and information. 
Carol lives in the Syracuse area, so seeing her at these 
workshops is a definite treat!
 Erika is rolling her jellyroll, which has been wrapped in 
a layer of tulle. To see the wide range of color palettes these 
three women used was absolutely amazing, not to mention 
the bounty of fiber they've amassed!
 Cheri, our Hostess with the Mostess!
Carol's wrapping her jellyroll in tulle, 
preparing it for the wetting stage and then rolling, rolling 
and more rolling.
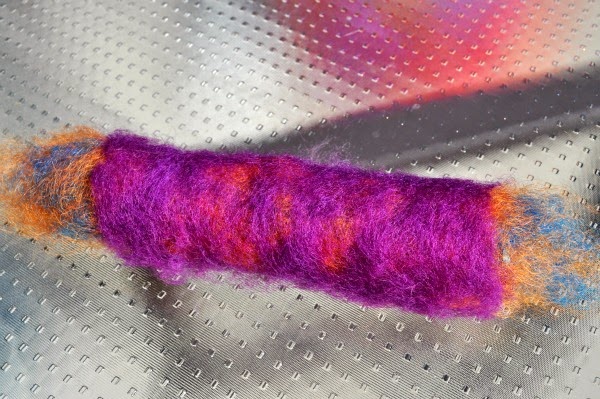
 Finally, the rolls are felted to the right firmness
and it's time to reveal the magic within!
Erika's roll swirled with rich, jewel-like colors,
reminiscent of VanGogh's Starry Night
 Carol's roll showed exquisite colors and contrast.
What a beauty.
 On what was a very chilly Fall morning,
Cheri's roll seemed to invoke all the rites of Spring. 
She thought these might make excellent buttons. 
These are some left over slices from a trivet I made.
Trivets can take the form of a circle, diamond or square.
If you choose to make a trivet, be careful to slice 
at an even thickness so your trivet is fairly level.
Then just sew through each disc always from the side, 
going all the way through and into the next disc, 
and so on. For strength and stability, back track often.
Pull your thread firmly as you go. Try to begin and end your
knots facing the inside of the trivet so they're invisible.

Now for the jellyroll tutorial.  :)
 Have a blast felting jellyrolls at your house!
 Round up a variety of high contrast colors of 
(preferably merino) batting and/or roving.
Approximately 2 oz. of each color per jellyroll.
You'll also need: 
a piece of tulle, approximately 16"x12"
two pieces of string
bamboo mat and a towel
hot soapy water in a sink or basin
 Steps 1-5 create the interior bullseye.
Step 1, spread a thin layer of color 1 with 
fibers running left to right. (Photo 1, above.)

Step 2, place a thin layer of color 2 with 
fibers oriented top to bottom.
(Photo 2, above.)

 Step 3, repeat step 1 using color 3.
(Photo 3, above.)
Step 4, repeat step 2 using color 4.
(Photo 4, above.)

TIP: Try to avoid layering two similar colors 
in a row. 
 Step 5, starting at a short end, tightly roll the 
stack of fibers. The tighter you roll now, 
the less rolling you'll do later.
 Set your bullseye roll aside.
 Similar to the previous method, lay out 
a thin layer of one color. 
Aim for contrast so the layers really look sharp
once they're cut into discs.
Place your bullseye roll on this layer of fiber 
and from the short end, roll tightly. (Photos 1 and 2)
Repeat this process for at least one more color, 
(photo 3)
but if you can manage more colors, do so.
The end result will be worth it!
As seen in the final pic above, if you have 
curly locks, sprinkle them on any layer for added fun!

Ready for the felting stage:
 Wrap your jellyroll in the piece of tulle, 
securely tying each end. 
(Photo 1, above, and photos of Carol and Erika, above.)

Fill a sink or plastic bin with a few inches of 
hot soapy water.
Blue Dawn, olive oil soap or glycerin soap  
all work well.

Quickly dip your roll into the hot soapy water, and
gently squeeze the water to the core of the jellyroll. 
Take care not to submerge too long or you could 
lose definition of the beautiful swirls and layers 
you've worked to create. 

On your bamboo mat, 
which I like to place on a towel for stability,
gingerly begin rolling your wetted jellyroll.

This first stage is just to get it to hold together - 
you're not using a lot of pressure yet.
(Photo 1, above.)

Roll it until you feel a skin forming and the roll 
beginning to hold it's shape, then remove the tulle.
(Photo 2, above.)

Now the work of rolling with pressure begins. 
Dip in the hot soapy water as often as you feel necessary. 
You're not going to hurt anything at this point. 
Just keep rolling until your jellyroll is dense. 
Very dense. 
(Photo 3, above)
Using a serrated knife or an electric knife,
cut your jellyroll straight down, like coins, 
or on an angle, pictured above.
Experiment and see what you come up with.

Notice the bullseye in the center surrounded by 
a few rounds of solid colors.

I hope you have a blast not only felting jellyrolls,
but finding great ways to use the resulting discs.
I've made trivets, and our group thought that buttons, 
jewelry and mobiles would be fun, too.
Pinterest is loaded with ideas, so see what you can find.
Let me know what you come up with. I'd love to hear!