Wednesday, September 28, 2011

Paper & Paste, Take 2

 After thinking about last week's paper & paste demo, 
I realized that showing how to make your own stencils with
a material you probably have on hand could be useful.

Here we go: raid your recycling bin. 
Find and wash a styrofoam tray of any size and shape. 
You may decide you want a few stencils for the same paper 
or for making several papers with one batch of paste. 
We're focusing on one stencil today.
 
 You only want the flat part of the foam tray or container, 
so cut away the sides and trim the flat piece to the size you need.
 Simple shapes can be effective design elements, so freehand or 
find objects to trace, like these coins in various sizes.
Using a craft knife on a cutting mat, insert the blade 
straight through the foam, hold it in place and gingerly rotate 
the foam against the blade rather than trying to drag 
the knife smoothly around your shape

Don't fear, it's easy. Just remember, gingerly.
Position your stencil on your paper.
This is a good time to consider how you're using the 
finished decorated paper. In this example, I'm going to 
cut my finished paper into a narrow strip and wrap it around 
a Christmas gift wrapped in brown paper. 
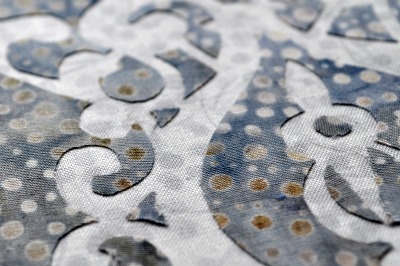
There's something so cheery about white polka dots on red.
 With your cooled paste made from the recipe 
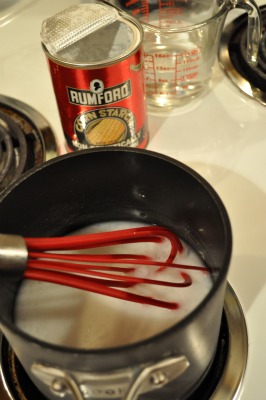
in last Wednesday's post, use your palette knife, 
plastic knife or spoon to fill each circle. 
Hold the foam in place with your free hand as you 
fill the shapes all the way up to the surface of your stencil. 

Once filled, carefully lift your stencil, wipe the back if needed, 
and lay your stencil down without touching the 
previously made circles. Repeat the process. 
You may decide to fill in some open areas of your design 
with only one or two of the shapes on your stencil. 

 Glitter. Because my paper will be used for decorating 
a holiday package, fine white glitter is in order.
Just sprinkle your glitter over your paste shapes before 
the paste dries. These photos aren't doing the glitter 
any justice. Glitter lovers understand. 

Here's a look at glittery white polka dots on red foil paper.
Let the paste dry completely before cutting the paper
The stencil is reusable, just rinse & dry.

Next week I'll share examples of how to use these 
decorative papers to their best advantage. 
Two words: limitless potential!

Sunday, September 25, 2011

Open Studio Sunday

My new drop spindle bag by JessaLu!
The Studio is quiet today because I'm recovering 
  
To see so many friends and favorite vendors
was a real treat. Have a look:
  
Bittersweet Woolery
Tina Martinez
Cal Patch
Cris Eschbach
JessaLu Bags
Jill Draper
Johanneshof Farm 
Christine Johnson
Melissa Stahl
Sisterhood of Saint Mary, Inc.
Greenwich, NY
Jessica M. Long-Wright 
 
Between last night & this morning, 
working toward trying my hand at three ply, 
I spun up these three Into The Whirled gems:
Left, The Bird Girl (BFL top)
Center, Queen of France (BFL top)
Right, Nebula (48s Romney top)
  
Thanks to my dear friend Mary Miller, 
who spins and knits pieces reminiscent of Monet,
my eyes are now open to the beauty of three ply
and a whole new world is at my feet.

The holidays are coming so you'll want to visit again on 
Wednesday for another paper & paste demo!


Wednesday, September 21, 2011

Paper and Paste

 Today's demo is a shout out to my "big sister" Val & her two 
smart, talented, funny, beautiful daughters, Cara & Maria.
I hope you three girls try this and get your hands dirty! 
  
is what inspired today's cornstarch paste demo.

To make your own beautiful papers with a wide range of uses
you'll need only a few items, which you probably already have.

Materials Round Up:
Stencil (home made or store bought)
Paper (plenty & any kind) 
Acrylic paints 
Palette knife or any tool you'd use to spread frosting 
 Cornstarch

 Step one: Mix and heat the paste.

I used Julia's recipe for 
Traditional Cooked Cornstarch Paste. 
Measure 2-1/2 cups of water and 
1/3 cup of cornstarch, 
pour into a pot and whisk constantly over 
medium high heat until boiling. 
Turn down heat, continue whisking until the 
mixture turns fairly transparent.
Let it cool.

(I skipped this next step:) 
Squeeze the cooled mixture through a strainer 
or cheesecloth to get rid of the lumps.
(I don't mind lumps.)

 
 Once cooled and strained, add acrylic paint in colors you love!
Mix well with your palette knife or plastic spoon.

Step 2: Prepare the work space.

Lay plastic on your work space, 
then place your paper on the plastic and 
tape along the top edge so the paper doesn't 
shift while you're working.
Finally, lay your stencil over the paper and
tape along a different edge for added stability.

Step 3: Spread the joy! 

 This is where the magic happens.
Use your palette knife and gingerly spread a dollop of 
paste over your stencil. Continue working the paste 
over the stencil until you have covered all of the areas 
you want from the stencil. Spread as thick or thin (or both) 
as you like. Careful. It's addicting because it's just that simple.

 My apologies for suddenly switching to red, but Blogger 
is having trouble uploading photos. 
So, after completing step 3 (spreading green all over the 
first sheet of paper) I had to keep going. Red it is. 

This time, I wanted to cover a larger surface, 
and was pleasantly surprised by tracing paper.
As you work the paste over the stencil, 
the tracing paper absorbs water from the paste 
and it ripples. The color paste highlights those ripples! 

Lay the stencil down along one edge of the paper of your choice, 
spread your color paste over the entire stencil. 
Gently lift the stencil so as to prevent smudging,
and carefully place it back down on the paper in the new space.
As you do this, avoid touching the neighboring wet paste.
Repeat the process as many times as you like.

 Ta-da!

Let dry and you have:
Wrapping paper
Note cards
Gift tags
Book covers...

and come back for Part II where you'll
get ideas for taking this decorative 
paper technique even further!

Sunday, September 18, 2011

Open Studio Sunday

Getting a jump on quilts for Project Linus and 
for stocking my Etsy shop has been fun, fun, fun
Basking in the sun, above, are quilt tops made this week:
the Friendship Star block (foreground) made 
with batiks, and the "S block (background) made with 
mostly Lizzy House's fabric line, Castle Peeps.  

Both blocks are perfect for a beginning quilter. 
I highly recommend trying them if you're looking for 
ideas for your first quilt. The Friendship Star block 
found here would look great as a scrappy quilt. 
Wait, that idea is definitely speaking to me!
My "S" block quilt was inspired by Kaffe Fassett's 
quilt found in this book.

Today in the Studio I've been experimenting with a new 
quilt design. While I'm not sold on it yet, I do like the castle 
towers broken into blocks. Stay tuned. It has promise.

Castle tower fabric designed by Lizzy House for Andover Fabrics
If I was a kid wrapped in a quilt made with 
this fabric, oh the places my imagination would go!

September splendor.

Wednesday, September 14, 2011

Ties That Bind


While the late summer sun is shining in upstate NY today, 
many people in flood-ravaged areas like Binghamton
are still just trying to recover and get back on their feet.

If you'd like to help in the effort to provide 
quilts & blankets to babies, kids and teens
across upstate NY, or in other unfortunate 
parts of our country facing wild fires and floods,
Project Linus is always accepting donations.

I'm sending out a HUGE thanks to the kind folks at Project Linus
because you can find my free Cartwheels quilt pattern here,
as well as many other fast, easy, free patterns.

You can quickly find your closest Project Linus chapter here.
Believe me, these volunteers make it really easy to give.

What takes a weekend to sew will provide 
comfort and warmth to a young person for years to come. 

My version of Kaffe Fassett's Diamonds quilt for Project Linus
This Blanketeer plans to whip up quilts for teens this weekend
which I'll show on Sunday before handing off to my new friends
at Project Linus.

He's a big kid at heart.

Bust your stash. 
Sew up some love. 

Sunday, September 11, 2011

Open Studio Sunday

 You know how some ideas just need time to simmer? 
Well, this weekend an idea moved from a long-time 
simmer to a rolling boil. Pictured here are 
close ups of my early experiments for a potential 
quilt series about women, hand work and time; 
layers of meaning that took hold more than 
20 years ago and are only now finding their way 
onto a tangible, physical surface.  

While this is only the first phase, I suspect there are 
more ideas, insights and exploration ahead of me.  
I just thought it might be nice to share my process with you. 
If you would be so kind, please stay tuned for more 
installments of my very personal, meaningful process.
Hearing your feedback, thoughts and impressions 
would mean the world to me. I hope you'll feel welcome to 
share in the comments section.
It's all a part of the process, and your input matters to me.
  
Now back to the Studio:
 Hot off the press are these "toy puppy" booties. 
100% hand sewn & embroidered, and absolutely 
cute as can be. A few more photos 
and then they'll appear in my Etsy shop along with 

a new crop of reversible 
flannel travel blankies & Clutch'ems!
Making these blankies and stuffed animals 
for toddler boys & girls always brings a smile to my face.
Pair them with a children's book and you've got 
the perfect baby shower gift.
Both sewing patterns are available on my Etsy shop 
for any one wishing to whip up your own set, 
and bust some of that fabric and ribbon stash as well!
Purchase of the Clutch'em set includes the 
reversible travel blankie instructions.


A final note:
Here, you know her as "my dear friend Tracy",
and now you can get to know her as your friend Tracy
by frequenting her new blog:
http://www.myretiringlife.blogspot.com
Tracy's current post is all about Spun Right Round's 
Grand Opening Celebration and is a fantastic look at 
Renee, her gorgeous shop and all the fun that was had Saturday.
Congratulations Renee, and welcome to Cortland!

Welcome Tracy. You were meant to blog! 

Wednesday, September 7, 2011

Dearly Departed?

We all have those little signs that tell us summer's 
easy, relaxed pace has departed, and that fall 
is once again on our doorstep.
For me, it's the frequent urge to bake & cook.

In case you've just dropped by, I've recently found 
success baking yeast breads from this book.

Now that we seem to always have a loaf of freshly baked 
bread on the counter, I'm so thankful to Rebecca Ringquist
for posting a jam recipe that is the most fragrant 
 jam I've ever had the pleasure of cooking (above.)
Not that I'm rushing it, but just wait
until I open one of these jars in February!

Cook up a batch of Plum Vanilla Jam
and get ready for a mouth-watering treat that's
perfect over ice cream, slathered on piping hot toast, 
drizzled on ricotta cheese, or remember the
toasted PB&J with homemade marshmallow?!


The days before home-baked bread.


Sunday, September 4, 2011

Open Studio Sunday

 Romantic Hydrangeas from the garden
soften an overcast, humid day.

 My first Rye bread out of the oven, 
and look at those air pockets!
Just for the record, (and I'm sure I'm the only one 
keeping score of my yeast bread wins and losses,) 
my hubby said this is the best Rye bread he's ever had.
To me, that's worth cranking up the oven to 450 degrees 
on this already hot & humid day. 

 And in between the flower cutting and the bread baking
there's a little sewing going on in the Studio today.

I've started a new crib quilt, but not my own design this time. 
Because I'm working with a very limited quantity of fabric, 
I felt more confident choosing a design for which 
I could see a completed version up front. 
You know that feeling.
You can't bring yourself to risk wasting any of that 
precious fabric on a trial run.

So, with the quilt design in place, cutting into
Lizzy House's "Castle Peeps" collection (above)
became so much fun! I've coveted this collection in my
stash for well over a year and have been saving it for
just the right project. *Squeal*
As I researched block patterns for this crib quilt, 
I knew the block the instant I saw it:
Kaffe Fassett's "S" Block Quilt found in
 
I can't wait to see this simple geometric design
played out in Lizzy House's fun, thoughtfully 
coordinated fabrics. The palette is just right, 
not pastel and not brights, but some where
in between, and is setting a really nice tone. 
Stay tuned for the finished quilt....
 But wait! There's more!
Spun Right Round's brand new shop in Cortland, NY 
is officially O-P-E-N.
I had to pop in on opening day, Friday, 
and clearly I wasn't the only person with 
that idea - Renee was swamped! 

Just look at my loot:
Above, a few of Renee's hand dyed rovings 
(I see mittens in my future. Thanks Mary!)
Check out the original art work on the labels, 
hand drawn by Renee's personal "artist in residence" 
& partner: the outrageously talented Kent.
Every girl needs a new / another (what's the difference?)
bag, so I invested in two for myself. The little zipper pouch
(notions pouch for my traveling embroidery projects) says
My 2 cents.
What else would it say?

Put Renee's Grand Opening Celebration on your calendar:
Saturday, September 10th
10:00 - 5:00
Fantabulous door prizes, 
tasty treats & a rockin' good time. 
 Don't miss it!