

Today's demo is a shout out to my "big sister" Val & her two
smart, talented, funny, beautiful daughters, Cara & Maria.
I hope you three girls try this and get your hands dirty!
is what inspired today's cornstarch paste demo.
To make your own beautiful papers with a wide range of uses
you'll need only a few items, which you probably already have.
Materials Round Up:
Stencil (home made or store bought)
Paper (plenty & any kind)
Acrylic paints
Palette knife or any tool you'd use to spread frosting
Cornstarch
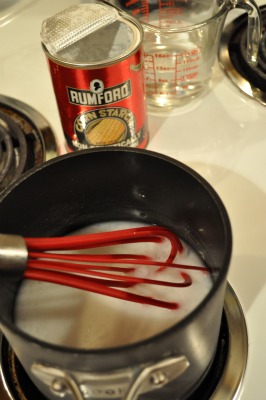
Step one: Mix and heat the paste.
I used Julia's recipe for
Traditional Cooked Cornstarch Paste.
Measure 2-1/2 cups of water and
1/3 cup of cornstarch,
pour into a pot and whisk constantly over
medium high heat until boiling.
Turn down heat, continue whisking until the
mixture turns fairly transparent.
Let it cool.
(I skipped this next step:)
Squeeze the cooled mixture through a strainer
or cheesecloth to get rid of the lumps.
(I don't mind lumps.)

Once cooled and strained, add acrylic paint in colors you love!
Mix well with your palette knife or plastic spoon.

Step 2: Prepare the work space.
Lay plastic on your work space,
then place your paper on the plastic and
tape along the top edge so the paper doesn't
shift while you're working.
Finally, lay your stencil over the paper and
tape along a different edge for added stability.

Step 3: Spread the joy!
This is where the magic happens.
Use your palette knife and gingerly spread a dollop of
paste over your stencil. Continue working the paste
over the stencil until you have covered all of the areas
you want from the stencil. Spread as thick or thin (or both)
as you like. Careful. It's addicting because it's just that simple.

My apologies for suddenly switching to red, but Blogger
is having trouble uploading photos.
So, after completing step 3 (spreading green all over the
first sheet of paper) I had to keep going. Red it is.
This time, I wanted to cover a larger surface,
and was pleasantly surprised by tracing paper.
As you work the paste over the stencil,
the tracing paper absorbs water from the paste
and it ripples. The color paste highlights those ripples!
Lay the stencil down along one edge of the paper of your choice,
spread your color paste over the entire stencil.
Gently lift the stencil so as to prevent smudging,
and carefully place it back down on the paper in the new space.
As you do this, avoid touching the neighboring wet paste.
Repeat the process as many times as you like.

Ta-da!
Let dry and you have:
Wrapping paper
Note cards
Gift tags
Book covers...
and come back for Part II where you'll
get ideas for taking this decorative
paper technique even further!
No comments:
Post a Comment